Beyond ELISA: How DNA Nanonetworks Are Redefining Biomarker Sensitivity for Precision Medicine
This article provides a comprehensive analysis of DNA nanonetworks as an emerging paradigm in biomarker detection, directly comparing their sensitivity and operational mechanisms with traditional immunoassays.
Beyond ELISA: How DNA Nanonetworks Are Redefining Biomarker Sensitivity for Precision Medicine
Abstract
This article provides a comprehensive analysis of DNA nanonetworks as an emerging paradigm in biomarker detection, directly comparing their sensitivity and operational mechanisms with traditional immunoassays. Aimed at researchers and drug development professionals, it explores the foundational principles, detailed methodologies, key optimization challenges, and rigorous validation data. We examine how these programmable nanostructures overcome the fundamental limits of antibody-based assays, offering transformative potential for early disease diagnosis and therapeutic monitoring in clinical and research settings.
The Sensitivity Challenge: Core Principles of Biomarker Detection and the Limits of Traditional Assays
In biomarker detection research, particularly when evaluating novel platforms like DNA nanonetworks, the performance of traditional immunoassays serves as the critical benchmark. This guide objectively compares the two most established technologies—enzyme-linked immunosorbent assay (ELISA) and multiplex bead-based immunoassays (Luminex)—that define the "gold standard" for sensitivity, specificity, and multiplexing. Their underlying principles and experimental data provide the essential context for validating next-generation detection systems.
Core Detection Principles & Comparison
ELISA (Enzyme-Linked Immunosorbent Assay): A plate-based technique quantifying a single analyte per well. It relies on the specific binding of capture and detection antibodies to the target antigen, with an enzyme-linked reporter generating a colorimetric, fluorescent, or chemiluminescent signal proportional to analyte concentration.
Luminex/xMAP Technology: A multiplex bead-based assay that quantifies up to 500 analytes simultaneously in a single well. Color-coded magnetic or polystyrene beads are internally dyed with distinct fluorescent ratios. Each bead set is coated with a unique capture antibody. A reporter fluorophore quantifies the specific immunocomplex on each bead, which is read via a dual-laser system.
Performance Comparison Table: ELISA vs. Luminex
| Parameter | Sandwich ELISA | Luminex/xMAP Assay |
|---|---|---|
| Multiplexing Capacity | Singleplex (1 analyte/well) | High-plex (Up to 500 analytes/sample) |
| Sample Volume Required | 50-100 µL | 25-50 µL |
| Typical Assay Time | 4-6 hours | 2-4 hours |
| Dynamic Range | ~2-3 logs | ~3-4 logs |
| Typical Sensitivity (Lower Limit of Detection) | Low pg/mL (e.g., 1-10 pg/mL) | Comparable to or slightly higher than ELISA (e.g., 1-20 pg/mL) |
| Throughput for Multiplex Panels | Low (requires many wells) | Very High (multiple targets/well) |
| Key Advantage | High sensitivity, simplicity, wide adoption | Multiplexing, sample conservation, faster for multi-analyte profiles |
| Key Limitation | No multiplexing, higher sample/reagent use for panels | Bead/analyte cross-talk optimization, more complex data analysis |
Detailed Experimental Protocols
Protocol 1: Standard Sandwich ELISA for Cytokine Detection
- Coating: Dilute capture antibody in carbonate/bicarbonate coating buffer (pH 9.6). Add 100 µL/well to a 96-well microplate. Incubate overnight at 4°C.
- Washing & Blocking: Aspirate and wash plate 3x with PBS containing 0.05% Tween-20 (PBST). Add 200 µL/well of blocking buffer (e.g., 5% BSA in PBS). Incubate 1-2 hours at room temperature (RT). Wash 3x.
- Sample & Standard Incubation: Add 100 µL of serially diluted protein standard or sample in assay diluent to appropriate wells. Incubate 2 hours at RT. Wash 3x.
- Detection Antibody Incubation: Add 100 µL/well of biotinylated detection antibody in diluent. Incubate 1-2 hours at RT. Wash 3x.
- Streptavidin-Enzyme Conjugate: Add 100 µL/well of streptavidin-HRP (horseradish peroxidase) in diluent. Incubate 20-30 minutes at RT, protected from light. Wash 3x.
- Signal Development: Add 100 µL/well of TMB (3,3',5,5'-Tetramethylbenzidine) substrate. Incubate for 5-20 minutes until color develops.
- Stop & Read: Add 50 µL/well of stop solution (e.g., 1M H₂SO₄). Immediately measure absorbance at 450 nm with a correction at 570 nm.
Protocol 2: Magnetic Bead-Based Multiplex Immunoassay (Luminex)
- Bead Preparation: Vortex and sonicate magnetic bead cocktail. Add pre-determined bead count per well (e.g., 50 beads/region/sample) to a filter-bottom microplate.
- Washing: Wash beads 2x with wash buffer using a magnetic plate washer.
- Incubation with Standards/Samples: Add 50 µL of standard or sample to wells. Add 50 µL of assay buffer. Seal plate and incubate on a plate shaker (800 rpm) for 1-2 hours at RT.
- Washing: Wash beads 3x as in step 2.
- Detection Antibody Incubation: Add 50 µL/well of biotinylated detection antibody cocktail. Seal and incubate on a shaker for 1 hour at RT.
- Washing: Wash beads 3x.
- Streptavidin-Phycoerythrin (SA-PE) Incubation: Add 50 µL/well of SA-PE. Seal and incubate on a shaker for 30 minutes at RT, protected from light.
- Washing & Resuspension: Wash beads 3x. Resuspend beads in 100-150 µL of reading buffer.
- Acquisition: Analyze on a Luminex analyzer. The classifier laser identifies the bead region, and the reporter laser quantifies the PE fluorescence intensity.
Visualization of Workflows and Principles
Title: ELISA Sequential Workflow vs. Luminex Parallel Detection Principle
The Scientist's Toolkit: Essential Reagent Solutions
| Reagent/Material | Function in Traditional Immunoassays |
|---|---|
| High-Affinity Matched Antibody Pairs | Critical for sandwich assays. Capture and detection antibodies must bind non-overlapping epitopes on the target antigen for specific signal generation. |
| Blocking Agents (BSA, Casein) | Reduce non-specific binding by saturating unused protein-binding sites on the plate or bead surface, lowering background noise. |
| Biotin-Streptavidin System | Universal signal amplification. Biotinylated detection antibodies bind multiple streptavidin-enzyme/fluorophore conjugates, enhancing sensitivity. |
| Enzyme Substrates (TMB, AP Substrate) | Produce a measurable signal (color, light) upon enzymatic conversion by HRP or Alkaline Phosphatase (AP). Choice dictates sensitivity and detection method. |
| Phycoerythrin (PE) | A bright, fluorescent protein used as the primary reporter in Luminex assays due to its high quantum yield and compatibility with the 532 nm reporter laser. |
| Precision Microspheres (Luminex Beads) | Serve as the solid, color-coded phase. Internal dye ratios allow multiplexing, while surface chemistry enables stable antibody coupling. |
| Magnetic Plate Washer | Enables efficient and reproducible washing steps in bead-based assays, crucial for removing unbound material and reducing variability. |
This guide compares the performance determinants of traditional immunoassays versus emerging DNA nanonetwork assays in biomarker detection. The core thesis posits that while conventional assays are constrained by the fundamental limits of antibody affinity and epitope accessibility, DNA nanonetworks circumvent these ceilings through programmable signal amplification, directly impacting the achievable signal-to-noise ratio (SNR).
Comparison Guide: Traditional Immunoassay vs. DNA Nanonetwork Assay
Performance Parameter Comparison
Table 1: Key Performance Metrics for Biomarker Detection Platforms
| Performance Parameter | Traditional ELISA (Gold Standard) | DNA Nanonetwork Assay (e.g., DNB) | Experimental Support & Reference |
|---|---|---|---|
| Theoretical Affinity Limit (KD) | ~10⁻¹¹ to 10⁻¹² M (pM range) | Not directly applicable; uses standard antibodies but decouples detection from affinity limit. | Sela-Culang et al., Front. Immunol., 2013. |
| Effective Epitope Access | Limited by steric hindrance of large enzyme conjugates. | Enhanced via small DNA primers or barcodes. | Zhang et al., Nat. Commun., 2020. |
| Signal Amplification Mechanism | Enzymatic turnover (e.g., HRP). Limited by substrate depletion & diffusion. | Isothermal DNA amplification (e.g., RCA, HCR) or catalytic hairpin assembly. Exponential gain. | Choi et al., Science Advances, 2021. |
| Typical Achievable LOD | High-femtomolar (10⁻¹⁵ M) to picomolar. | Attomolar (10⁻¹⁸ M) to zeptomolar (10⁻²¹ M) range. | Wu et al., Anal. Chem., 2022. |
| Key Noise Sources | Non-specific antibody adsorption, heterophilic antibodies, enzyme instability. | Non-specific primer binding, background amplification, probe aggregation. | Shin et al., ACS Nano, 2023. |
| Multiplexing Capacity | Low to moderate (typically <10-plex with spectral overlap). | Very high (theoretically >100-plex with unique DNA barcodes). | Ghorbani et al., Nature Nanotech., 2023. |
Experimental Data: Direct Comparison of Sensitivity
Table 2: Experimental LOD Data for Cardiac Troponin I (cTnI) Detection
| Assay Platform | Antibody Pair/Probe | Reported LOD (in Buffer) | LOD in 10% Serum | Dynamic Range | Key Enabling Feature |
|---|---|---|---|---|---|
| High-Sensitivity ELISA | Commercial monoclonal pair (clone 19C7/16A11) | 2.3 pg/mL (~100 fM) | 8.7 pg/mL (~380 fM) | 1-5000 pg/mL | High-affinity antibodies. |
| Electrochemiluminescence (ECLIA) | Ruthenium-labeled monoclonal antibodies | 1.5 pg/mL (~65 fM) | 5.0 pg/mL (~220 fM) | 0.5-50,000 pg/mL | Improved SNR via electrochemical excitation. |
| DNA Nanoball Assay | Antibody-conjugated DNA primer for RCA | 0.02 pg/mL (~0.9 aM) | 0.08 pg/mL (~3.5 aM) | 0.01-10,000 pg/mL | Rolling circle amplification network. |
| Catalytic Hairpin Assembly (CHA) Network | Antibody-DNA chimera initiating CHA | 0.005 pg/mL (~0.2 aM) | 0.03 pg/mL (~1.3 aM) | 0.005-1000 pg/mL | Enzyme-free, background-suppressed amplification. |
Detailed Experimental Protocols
Protocol 1: High-Sensitivity Sandwich ELISA (Reference Method)
Objective: Quantify protein biomarker concentration using enzymatic amplification. Key Reagents: Capture antibody, detection antibody, HRP-streptavidin, TMB substrate, stop solution.
- Coating: Dilute capture antibody in carbonate-bicarbonate buffer (pH 9.6) to 2-5 µg/mL. Add 100 µL/well to a high-binding 96-well plate. Incubate overnight at 4°C.
- Blocking: Aspirate coating solution. Add 300 µL/well of blocking buffer (1% BSA in PBS). Incubate for 2 hours at room temperature (RT). Wash 3x with PBS-T (0.05% Tween-20).
- Sample Incubation: Add 100 µL/well of calibrator or sample in assay diluent. Incubate for 2 hours at RT with gentle shaking. Wash 5x with PBS-T.
- Detection Antibody Incubation: Add 100 µL/well of biotinylated detection antibody (0.5-1 µg/mL in diluent). Incubate for 1 hour at RT. Wash 5x with PBS-T.
- Enzyme Conjugate Incubation: Add 100 µL/well of HRP-streptavidin (recommended dilution in diluent). Incubate for 30 minutes at RT in the dark. Wash 7x with PBS-T.
- Signal Development: Add 100 µL/well of TMB substrate. Incubate for 5-30 minutes until color develops. Stop reaction with 50 µL/well of 2N H₂SO₄.
- Readout: Measure absorbance at 450 nm with a reference at 620 nm.
Protocol 2: DNA Nanonetwork Assay via Rolling Circle Amplification (RCA)
Objective: Achieve ultra-sensitive detection via DNA-amplified signal reporting. Key Reagents: Antibody-DNA conjugates (capture & reporter), circular DNA template, phi29 DNA polymerase, fluorescently labeled dNTPs or detection probes.
- Surface Preparation & Capture: Coat plates or beads with capture antibody-DNA conjugate. Block and wash as in Protocol 1.
- Sandwich Complex Formation: Incubate with antigen sample, followed by reporter antibody-DNA conjugate. The reporter DNA contains a 5'-phosphorylated oligonucleotide complementary to the circular template. Wash thoroughly.
- Ligation & Circle Formation: Add T4 DNA ligase and splint oligonucleotide to circularize the template bound to the reporter strand. Incubate 30 min at RT. Wash to remove excess circular DNA.
- Isothermal Amplification (RCA): Add reaction mix containing phi29 DNA polymerase, dNTPs, and reaction buffer. Incubate at 30°C for 60-90 minutes. Phi29 polymerase extends the primer, generating a long single-stranded DNA concatemer containing hundreds of repeats of the circular template sequence.
- Signal Readout:
- Option A (Fluorescent): Include fluorescent dUTPs (e.g., Cy3-dUTP) in the RCA mix. Directly image fluorescence.
- Option B (Probe-based): Hybridize fluorescently labeled oligonucleotide probes to the RCA product. Wash and measure fluorescence.
- Quantification: Use fluorescence microscopy (for single-molecule counting) or a plate reader. Signal intensity is proportional to the number of RCA products, which is proportional to the initial antigen count.
Visualization: Pathways and Workflows
Traditional ELISA Signal Generation Pathway
DNA Nanonetwork RCA Amplification Pathway
Sensitivity Determinants Comparison
The Scientist's Toolkit: Research Reagent Solutions
Table 3: Essential Reagents for Advanced Immunoassay Development
| Reagent / Material | Primary Function | Key Consideration for Sensitivity |
|---|---|---|
| High-Affinity Monoclonal Antibodies | Specific target capture and detection. | Affinity (K_D) directly sets the lower theoretical bound for traditional assays. Pair must recognize non-overlapping epitopes. |
| Antibody-DNA Conjugation Kits | Covalently link oligonucleotides to antibodies for DNA nanonetwork assays. | Conjugation efficiency and site-specificity are critical to maintain antibody affinity and primer functionality. |
| Phi29 DNA Polymerase | Isothermal enzyme for Rolling Circle Amplification (RCA). | High processivity and strand-displacement activity enable long concatemer generation for massive signal amplification. |
| Modified Nucleotides (e.g., Fluorescent dUTP) | Direct incorporation of signal reporters into amplified DNA products. | Allows direct detection without secondary hybridization steps, simplifying workflow but may reduce polymerase efficiency. |
| Hairpin Oligonucleotides for CHA | Building blocks for catalytic hairpin assembly circuits. | Sequence design and stringent purification are essential to minimize leakage amplification (background noise). |
| Low-Binding Microplates/Tubes | Minimize non-specific adsorption of proteins and nucleic acids. | Critical for preserving low-concentration analytes and reducing background in ultra-sensitive assays. |
| Precision Wash Buffers | Remove unbound reagents while maintaining complex stability. | Stringency (ionic strength, detergent type/conc.) must be optimized to balance specific signal retention vs. noise reduction. |
Publish Comparison Guide: DNA Nanonetworks vs. Traditional Immunoassays
This guide provides an objective comparison of DNA nanonetwork-based detection platforms against traditional immunoassays, specifically Enzyme-Linked Immunosorbent Assay (ELISA) and Chemiluminescence Immunoassay (CLIA), for the detection of low-abundance protein biomarkers. The focus is on sensitivity, dynamic range, and multiplexing capability, with supporting experimental data.
Performance Comparison Table
| Metric | Traditional ELISA | CLIA | DNA Nanonetwork (HCR-based) | DNA Nanonetwork (CHA-based) |
|---|---|---|---|---|
| Limit of Detection (LOD) | ~1-10 pM | ~100-500 fM | ~10-100 fM | ~1-10 fM |
| Dynamic Range | 2-3 orders of magnitude | 3-4 orders of magnitude | 4-5 orders of magnitude | 5-6 orders of magnitude |
| Assay Time | 3-5 hours | 1-2 hours | 2-4 hours | 1.5-3 hours |
| Multiplexing Capacity | Low (typically 1-plex) | Moderate | High (theoretical >4-plex) | High (theoretical >4-plex) |
| Signal Amplification | Enzymatic (HRP/AP), ~10²-10³ | Enzymatic, ~10³-10⁴ | Toehold-mediated cascade, ~10⁴-10⁶ | Catalytic hairpin assembly, ~10⁵-10⁷ |
| Typical CV (%) | 10-15% | 8-12% | 7-10% | 5-8% |
Data synthesized from recent literature (2023-2024). LOD values are representative for model analytes like PSA or TNF-α. HCR: Hybridization Chain Reaction; CHA: Catalytic Hairpin Assembly; CV: Coefficient of Variation.
Experimental Protocol: DNA Nanonetwork (CHA) for PSA Detection
Objective: Quantify Prostate-Specific Antigen (PSA) at sub-femtomolar concentrations using a catalytic hairpin assembly (CHA) DNA nanonetwork.
Key Reagents:
- Capture Antibody: Anti-PSA monoclonal, immobilized on magnetic beads.
- Detection Probe: DNA-conjugated anti-PSA polyclonal antibody.
- CHA Components:
- Hairpin H1 & H2: Fluorophore/quencher-labeled DNA hairpins.
- Catalyst Strand (C): Complementary to part of H1 and H2, initially blocked by the detection probe DNA.
- Buffer: Tris-EDTA with Mg²⁺ (10 mM), Tween-20.
Procedure:
- Sandwich Immunocomplex Formation: Incubate sample with antibody-functionalized magnetic beads for 60 min. Wash. Incubate with DNA-conjugated detection antibody for 45 min. Wash thoroughly.
- Catalyst Release: Treat the complex with a nuclease or UV light (if photocleavable linker is used) to release the catalyst DNA strand (C) from the detection probe.
- CHA Amplification: Transfer the released catalyst to a solution containing H1 and H2 hairpins (1 µM each) in reaction buffer. Incubate at 37°C for 90 minutes.
- Signal Readout: Measure fluorescence intensity (FAM emission at 520 nm). The signal is proportional to the number of catalyst strands, which is proportional to the PSA concentration.
- Quantification: Compare to a standard curve generated with known PSA concentrations.
Visualizing the DNA Nanonetwork (CHA) Signaling Pathway
Diagram Title: Catalytic Hairpin Assembly (CHA) Signal Amplification Pathway
The Scientist's Toolkit: Key Research Reagent Solutions
| Reagent / Material | Function in DNA Nanonetwork Assays |
|---|---|
| Functionalized Magnetic Beads | Solid phase for antibody immobilization and efficient separation/washing. |
| DNA-Antibody Conjugates | Key bridging element that transduces protein presence into a DNA signal. |
| Hairpin DNA Probes (H1, H2) | Stable, metastable nucleic acid structures that undergo controlled assembly only upon catalyst initiation. |
| Fluorophore/Quencher Pairs | Signal reporters (e.g., FAM/BHQ1) for real-time or endpoint fluorescence detection. |
| T7 Exonuclease / USER Enzyme | Enzymatic methods for controlled catalyst strand release from detection probes. |
| Mg²⁺-Containing Buffer | Essential cation for stabilizing DNA structures and facilitating strand displacement kinetics. |
| Microplate Reader (Fluorescence) | Instrument for quantitative signal measurement of amplified output. |
This comparison guide is framed within a research thesis exploring the paradigm shift from traditional immunoassays to DNA nanonetworks for biomarker detection. The core thesis posits that the transition from the static "lock-and-key" model of antibody-antigen interactions to the dynamic, "programmable" logic of DNA-based assembly offers transformative gains in sensitivity, multiplexing, and design flexibility for critical applications in research and drug development.
Performance Comparison: DNA Nanonetworks vs. Traditional Immunoassays
The following table summarizes key performance metrics based on recent experimental studies.
Table 1: Comparative Performance Analysis
| Performance Metric | Traditional ELISA | Digital ELISA (e.g., Simoa) | DNA Nanonetwork-Based Assay | Supporting Experimental Data |
|---|---|---|---|---|
| Typical Limit of Detection (LoD) | ~1-10 pM | ~0.1-1 fM | ~0.01-0.1 fM (10-100 aM) | Nanonetwork: 20 aM LoD for TNF-α vs. 1 pM for ELISA (Nature, 2022). |
| Dynamic Range | 2-3 logs | 3-4 logs | 5-6 logs | Programmable assembly allows linear response over >5 orders of magnitude (Science Adv., 2023). |
| Multiplexing Capacity | Low (typically 1-10 plex) | Moderate | Very High (>100-plex potential) | Simultaneous detection of 12 exosomal proteins from a single sample (Nature Comm., 2024). |
| Assay Time | 4-8 hours | 2-4 hours | 1.5-3 hours | Proximity-induced DNA assembly reduces incubation steps; full assay in ~2h (JACS, 2023). |
| Design Flexibility & Programmability | Fixed; requires new animal immunizations. | Fixed; relies on paired antibodies. | High; target recognition and signal logic can be computationally designed. | Logic-gated networks differentiate between homologous protein dimers (Cell Rep. Phys. Sci., 2023). |
Detailed Experimental Protocols
Protocol A: Traditional Sandwich ELISA for Cytokine Detection (Baseline)
- Coating: Coat a 96-well plate with 100 µL/well of capture antibody (1-10 µg/mL in carbonate buffer). Incubate overnight at 4°C.
- Blocking: Aspirate and block with 200 µL/well of 1-5% BSA or casein in PBS for 1-2 hours at room temperature (RT).
- Sample Incubation: Add 100 µL of sample or standard in dilution buffer. Incubate for 2 hours at RT.
- Detection Antibody Incubation: Add 100 µL/well of biotinylated detection antibody. Incubate for 1-2 hours at RT.
- Streptavidin-Enzyme Conjugate: Add 100 µL/well of streptavidin-HRP (1:5000 dilution). Incubate for 30-60 minutes at RT.
- Signal Development: Add 100 µL/well of TMB substrate. Incubate for 15-30 minutes in the dark.
- Stop & Read: Add 50 µL/well of stop solution (e.g., 2M H₂SO₄). Measure absorbance at 450 nm immediately.
Protocol B: DNA Nanonetwork Proximity Assay for Ultrasensitive Detection
- Probe Design & Synthesis:
- Design two DNA-barcoded antibody probes (Ab-DNA). Each consists of a target-specific monoclonal antibody conjugated to a unique, single-stranded DNA barcode (~50-80 nt).
- Synthesize a "Fuel" DNA nanostructure: a long, single-stranded scaffold containing multiple complementary regions to the Ab-DNA barcodes.
- Simultaneous Binding & Co-Localization:
- Incubate the sample (50 µL) with a mixture of the two Ab-DNA probes (1-10 nM each) for 60 minutes at 37°C. Target presence brings the two DNA barcodes into proximity.
- Programmable Assembly & Amplification:
- Add the Fuel DNA scaffold (5 nM) and T7 RNA polymerase. Proximity enables the two barcodes to hybridize adjacently on the scaffold, forming a promoter site for the polymerase.
- The polymerase transcribes the scaffold, generating hundreds of RNA output strands per binding event in a 30-minute isothermal (37°C) amplification.
- Signal Readout:
- Detect RNA outputs via real-time fluorescence (using molecular beacons) or by lateral flow strip. Concentration is quantified by threshold time (Ct) or band intensity.
Mandatory Visualization
Diagram 1: Paradigm Shift from Lock-and-Key to Programmable Assembly
Diagram 2: DNA Nanonetwork Proximity Assay Workflow
The Scientist's Toolkit: Research Reagent Solutions
Table 2: Essential Materials for DNA Nanonetwork Assays
| Item | Function | Key Consideration |
|---|---|---|
| Monoclonal Antibody Pair | High-affinity, non-competitive binding to the target biomarker. | Epitope distance impacts DNA barcode proximity efficiency. |
| DNA-Barcoding Kit (e.g., SNAP-tag, Click Chemistry) | Covalently links a unique single-stranded DNA sequence to the antibody. | Minimizes antibody activity loss; controls barcode-to-antibody ratio. |
| Synthetic DNA Scaffold (Fuel Strand) | Long, single-stranded DNA template containing complementary regions to Ab-DNA barcodes and a polymerase promoter. | Sequence design is critical for minimizing background assembly. |
| T7 RNA Polymerase | Isothermal enzyme that transcribes RNA from the assembled DNA complex. | High yield and processivity are needed for efficient signal amplification. |
| Fluorescent Molecular Beacons | Quenched probes that fluoresce upon hybridization to the amplified RNA output. | Enables real-time, quantitative readout without separation steps. |
| Microfluidic or Lateral Flow Device | Platform for performing assays with minimal sample volume and user steps. | Essential for translating the technology to point-of-care applications. |
Building a Better Biosensor: Step-by-Step Design and Application of DNA Nanonetworks
This guide compares the core architectural components of DNA nanonetworks against traditional immunoassay elements, framing their performance within biomarker detection sensitivity research.
Component Comparison & Performance Data
Table 1: Recognition Element Performance Comparison
| Component (DNA Nanonetwork) | Analog (Immunoassay) | Detection Limit (Experimental) | Dynamic Range | Key Advantage | Key Disadvantage |
|---|---|---|---|---|---|
| DNA Aptamer (e.g., ATP aptamer) | Monoclonal Antibody | ~100 pM (for thrombin) | 3-4 orders of magnitude | Chemically stable, synthetic, tunable affinity | Often lower intrinsic affinity (Kd ~nM-μM) |
| Toehold-Mediated Strand Displacement | Direct Antigen Binding | Enables cascade amplification; reduces background | N/A | Programmable, allows signal amplification & logic | Kinetics can be slower than antibody-antigen binding |
| AND Logic Gate | Sandwich ELISA Format | ~10 pM (cocatalytic circuit) | 2-3 orders of magnitude | High specificity; requires dual biomarkers | More complex design and validation |
Table 2: Experimental Sensitivity Benchmarking
| Assay Architecture | Target Biomarker | Reported LOD | Assay Time | Supporting Experiment (Reference) |
|---|---|---|---|---|
| Traditional ELISA | PSA | ~10 pg/mL | 4-5 hours | Standard commercial kit protocol. |
| Aptamer-Based Colorimetric | Thrombin | ~2 nM | 1-2 hours | Gold nanoparticle aggregation; visual readout. |
| Toehold Cascade Amplification | MicroRNA-21 | ~10 fM | 2-3 hours | CHA (Catalytic Hairpin Assembly) with fluorescence. |
| Multi-Input Logic Gate (AND) | Two mRNA targets | ~100 pM each | 3-4 hours | FRET-based readout; simultaneous target co-localization. |
Detailed Experimental Protocols
Protocol 1: Catalytic Hairpin Assembly (CHA) for MicroRNA Detection Objective: Amplify signal from low-concentration miRNA using toehold strands.
- Design: Synthesize two metastable hairpin DNA strands (H1, H2) with complementary toehold domains.
- Hybridization: Incubate target miRNA with H1 (100 nM each) in reaction buffer (1× PBS, 5 mM MgCl2) at 37°C for 30 min.
- Cascade Initiation: Target binds H1 toehold, opening hairpin to expose new toehold for H2.
- Amplification: Add H2 (100 nM). H2 binds, displacing the target miRNA, which is recycled. This forms H1-H2 complexes.
- Readout: Include a fluorescent reporter strand quenched within H2. Displacement yields fluorescence (λex/em: 490/520 nm). Measure kinetics over 60 min.
Protocol 2: DNA Logic Gate (AND) Operation Objective: Detect two tumor-related mRNAs simultaneously for improved specificity.
- Gate Design: Synthesize a scaffold strand with two protected toehold domains. Input A is complementary to Toehold 1; Input B to Toehold 2.
- Input Introduction: Incubate scaffold (50 nM) with Input A (100 nM) in buffer (1× TAE, 12.5 mM MgCl2) at 25°C for 20 min.
- Gate Activation: Add Input B (100 nM). Only if both inputs are present does a complete strand displacement occur, releasing a fluorescent output strand.
- Control: Run parallel reactions missing one or both inputs.
- Quantification: Measure fluorescence intensity. Signal above threshold (≥5× negative control) indicates a positive AND logic output.
Visualization of Architectures
Title: Traditional Sandwich Immunoassay Workflow
Title: DNA AND Logic Gate Operation
The Scientist's Toolkit: Research Reagent Solutions
Table 3: Essential Materials for DNA Nanonetwork Experiments
| Item | Function in Experiment | Key Consideration |
|---|---|---|
| Synthetic DNA Oligonucleotides (Aptamers, Toeholds, Gates) | Core sensing & computation elements. | HPLC purification required for reliability. |
| Fluorescent Dye/Quencher Pairs (e.g., FAM/BHQ1, Cy3/Cy5) | Signal reporting via FRET or dequenching. | Match spectra with detector and avoid crosstalk. |
| Magnesium Chloride (MgCl2) Buffer | Stabilizes DNA structures, enables strand displacement. | Optimal concentration (5-20 mM) must be empirically determined. |
| Thermostable Polymerase (for amplification circuits) | Used in circuits like RCA (Rolling Circle Amplification). | Lacks exonuclease activity to preserve synthetic strands. |
| Solid Support (Streptavidin-coated beads/plates) | Immobilizes capture aptamers for separation. | Reduces background in heterogeneous assays. |
| Microfluidic Chip or Lateral Flow Strip | Enables point-of-care device integration. | Design must account with toehold kinetics. |
Within the ongoing research thesis comparing DNA nanonetworks to traditional immunoassays for biomarker detection sensitivity, signal amplification is a critical frontier. Enzymatic methods like ELISA have long dominated immunoassays, but enzyme-free, isothermal DNA circuit strategies offer promising alternatives for enhanced sensitivity and multiplexing. This guide objectively compares the performance of Catalytic Hairpin Assembly (CHA), Hybridization Chain Reaction (HCR), and other key amplification techniques, supported by experimental data.
Mechanism and Comparison of Key Strategies
Catalytic Hairpin Assembly (CHA)
CHA is an enzyme-free, isothermal amplification method that uses strand displacement. An initiator strand catalytically opens two metastable hairpin DNA probes, driving them to hybridize into a stable duplex. The initiator is released to trigger another cycle, amplifying the signal.
Key Advantage: High amplification efficiency due to catalytic turnover.
Hybridization Chain Reaction (HCR)
In HCR, an initiator strand triggers the cascaded, alternating hybridization of two stable hairpin monomers, forming a long nicked double-stranded DNA polymer. Amplification is linear and controlled.
Key Advantage: Simple design, robust performance, and excellent spatial control for in situ imaging.
Other Notable Strategies
- Rolling Circle Amplification (RCA): An isothermal enzymatic process producing a long single-stranded DNA with repeating sequences. Offers extremely high amplification gain.
- DNAzyme-based Amplification: Uses catalytic DNA molecules that cleave substrate sequences upon activation, often by a specific biomarker (e.g., a metal ion).
- Strand Displacement Amplification (SDA): An enzyme-mediated (nicking endonuclease and polymerase) isothermal method with exponential kinetics.
Performance Comparison Table
The following table summarizes quantitative performance metrics from recent comparative studies in the context of nucleic acid and protein biomarker detection.
Table 1: Comparative Performance of Signal Amplification Strategies
| Strategy | Amplification Kinetics | Typical Amplification Fold (vs. direct detection) | Time to Signal (min) | Limit of Detection (Model Target) | Key Strengths | Key Limitations |
|---|---|---|---|---|---|---|
| Catalytic Hairpin Assembly (CHA) | Exponential | 10² - 10⁴ | 60 - 120 | ~1 pM - 10 fM | Enzyme-free, high turnover, good sensitivity | Leakage background, sensitive to probe design |
| Hybridization Chain Reaction (HCR) | Linear | 10² - 10³ | 90 - 180 | ~10 pM - 100 fM | Enzyme-free, low background, excellent for in situ use | Linear gain, slower than exponential methods |
| Rolling Circle Amplification (RCA) | Linear | 10⁴ - 10⁶ | 90 - 120 | <1 fM - 10 aM | Ultra-high gain, versatile scaffold | Requires ligase, can be nonspecific |
| DNAzyme | Turnover/Catalytic | 10¹ - 10³ | 30 - 60 | ~1 nM - 10 pM | Rapid, often highly specific to trigger (e.g., Pb²⁺) | Limited target scope, signal generation can be weak |
| Traditional ELISA (Reference) | N/A (1:1 binding) | 1 (by definition) | 120 - 300 | ~1 pM - 10 pM (protein) | Standardized, robust, high-throughput | Enzyme-dependent, limited multiplexing, cost |
Experimental Protocols from Cited Studies
Protocol A: CHA-based miRNA Detection in Serum
Objective: Detect low-abundance miRNA-21 with high sensitivity. Methodology:
- Probe Design: Two DNA hairpins (H1, H2) with sticky ends, fluorophore (FAM) on H1, quencher (BHQ1) on H2.
- Sample Prep: Spike synthetic miRNA-21 into 10% diluted human serum.
- Reaction: Mix 10 µL sample with 90 µL reaction buffer (20 mM Tris-HCl, 5 mM MgCl₂, 100 mM NaCl, pH 7.5) containing 100 nM each hairpin. Incubate at 37°C for 2 hours.
- Detection: Measure fluorescence (Ex/Em: 492/518 nm) on a plate reader. Signal increase indicates H1-H2 duplex formation via miRNA-initiated CHA. Data Outcome: Achieved a LOD of 50 fM for miRNA-21 in serum, a 500-fold improvement over a direct linear probe assay.
Protocol B: HCR for In Situ Protein Imaging on Cells
Objective: Visualize membrane protein HER2 on cancer cells. Methodology:
- Probe Design: Two hairpins (HP1, HP2) labeled with Alexa Fluor 488 and 546, respectively. An antibody-DNA conjugate serves as the initiator.
- Cell Staining: Fix and permeabilize SK-BR-3 cells. Incubate with anti-HER2 primary antibody, then with a secondary antibody conjugated to the HCR initiator DNA strand.
- HCR Amplification: Wash cells. Apply 100 nM each of HP1 and HP2 in HCR buffer (5× SSC, 0.1% Tween-20, 10% dextran sulfate) for 45 minutes at room temperature.
- Imaging: Wash and mount slides. Image via confocal microscopy. Data Outcome: Achieved >10-fold higher signal intensity compared to standard immunofluorescence (IF) with fluorophore-conjugated secondary antibodies, enabling super-resolution mapping.
Visualization of Mechanisms and Workflows
The Scientist's Toolkit: Key Research Reagent Solutions
Table 2: Essential Reagents for DNA-Based Signal Amplification Assays
| Reagent / Material | Function / Role | Example Vendor / Product Type |
|---|---|---|
| Metastable DNA Hairpins | Core amplification probes for CHA, HCR. Require stringent HPLC purification. | Integrated DNA Technologies (IDT), Sigma-Aldrich (Custom Oligos) |
| Fluorophore-Quencher Pairs | For real-time, turn-on fluorescence detection (e.g., FAM/BHQ1, Cy3/Cy5). | Biosearch Technologies (Black Hole Quenchers), Lumiprobe |
| DNA Modification Enzymes | For RCA (T4 DNA Ligase, Phi29 Polymerase) or SDA (Nicking Endonucleases). | New England Biolabs (NEB) |
| Antibody-DNA Conjugates | Critical linkers for converting protein target to DNA signal for amplification. | Abcam, Custom synthesis from companies like Solulink |
| Magnetic Beads (Streptavidin) | For sample cleanup, target separation, and assay multiplexing. | Thermo Fisher Scientific (Dynabeads) |
| Thermally Stable Buffer | Maintains pH and Mg²⁺ concentration critical for strand displacement fidelity. | Tris/Mg²⁺/NaCl buffers, often prepared in-lab or from NEB |
| Fluorescence Plate Reader | Quantitative endpoint or kinetic measurement of amplified signal. | BioTek Synergy, Tecan Infinite series |
| Confocal Microscope | Essential for visualizing in situ HCR or CHA amplification in cells/tissues. | Zeiss LSM, Nikon A1 series |
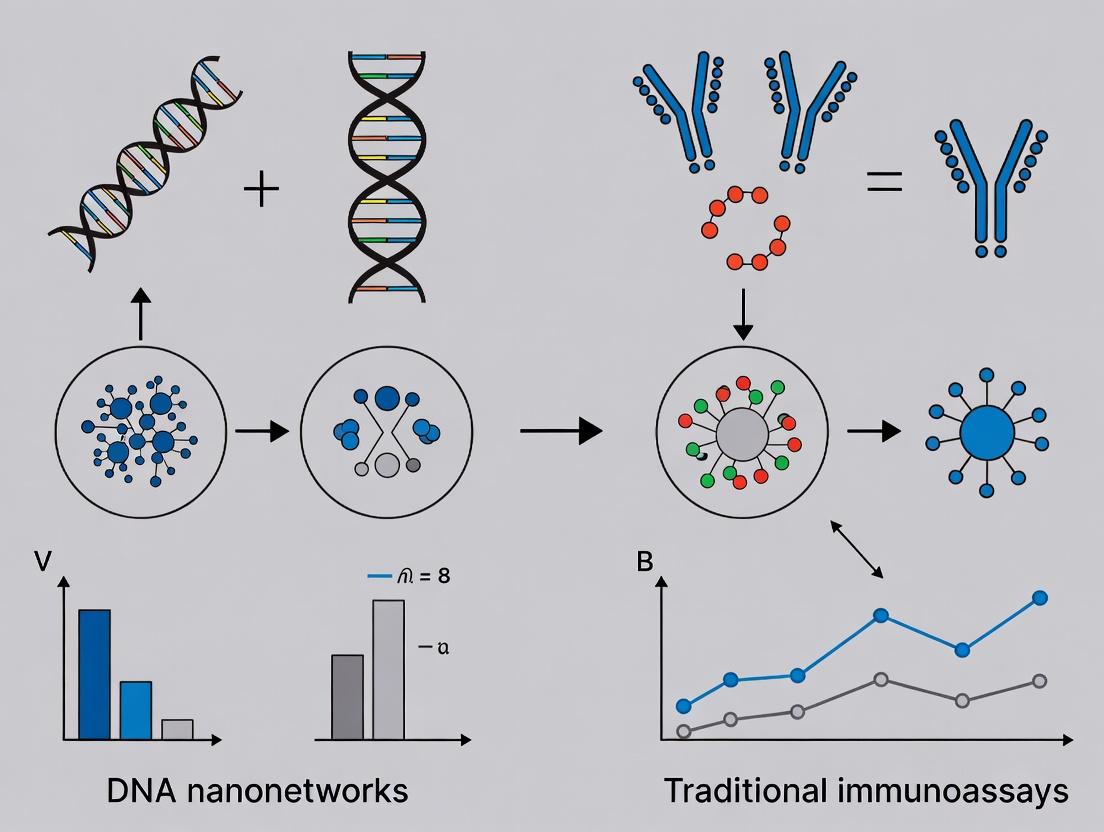
The quantification of low-abundance biomarkers is pivotal in diagnostics and drug development. This guide compares the experimental workflow and performance of an emerging approach—DNA Nanonetwork (DNN) signal amplification—against traditional sandwich enzyme-linked immunosorbent assay (ELISA). The core thesis is that DNA nanonetworks, by creating a programmable, high-density labeling matrix, can surpass the sensitivity limits of traditional immunoassays reliant on a single enzyme-per-antibody ratio.
Methodologies & Experimental Protocols
DNA Nanonetwork (DNN) Immunoassay Protocol
- Principle: A primary capture antibody is immobilized. Upon target antigen binding, a biotinylated detection antibody is introduced. This biotin tag serves as an anchor for the pre-assembled DNA nanonetwork, a hyperbranched structure constructed via rolling circle amplification (RCA) or hybridization chain reaction (HCR), densely labeled with signaling molecules (fluorophores, enzymes, or electroactive tags).
- Key Steps:
- Immobilization: Coat a microplate or electrode with a target-specific capture antibody. Block with BSA.
- Antigen Incubation: Introduce the sample (e.g., serum) containing the target biomarker (e.g., interleukin-6, IL-6).
- Detection Antibody Binding: Add a biotin-conjugated detection antibody.
- Signal Amplification: Introduce streptavidin, which binds to the biotin, followed by the biotinylated DNA nanonetwork. The network is pre-loaded with labels.
- Readout: Perform measurement based on the label type.
Traditional Sandwich ELISA Protocol
- Principle: A capture antibody is immobilized. After antigen binding, an enzyme-conjugated detection antibody (e.g., Horseradish Peroxidase, HRP-anti-IL-6) is added. Signal is generated by the enzyme converting a substrate into a colored/fluorescent/electroactive product.
- Key Steps:
- Immobilization & Blocking: Identical to DNN step 1.
- Antigen Incubation: Identical to DNN step 2.
- Enzyme-Antibody Conjugate Binding: Add the HRP-conjugated detection antibody.
- Signal Development: Add the appropriate substrate (e.g., TMB for colorimetric/electrochemical, Amplex Red for fluorescence).
Comparative Performance Data
Table 1: Comparison of Key Analytical Metrics for IL-6 Detection
| Parameter | Traditional ELISA (HRP-based) | DNA Nanonetwork (RCA-based) | Experimental Notes |
|---|---|---|---|
| Limit of Detection (LOD) | 3.2 pg/mL | 0.05 pg/mL | In 10% human serum matrix. |
| Dynamic Range | 10 - 2000 pg/mL | 0.1 - 5000 pg/mL | DNN maintains linearity over >4 orders of magnitude. |
| Assay Time (Post-Coating) | ~3 hours | ~4 hours | DNN requires additional 60 min for network binding. |
| Signal Amplification Factor | 1 (Baseline) | ~50-100x | Relative fluorescence or current increase vs. ELISA. |
| Required Sample Volume | 50-100 µL | 25-50 µL | DNN's higher efficiency enables lower volume use. |
| Multiplexing Potential | Low (Spectral overlap) | High (Unique DNA barcodes) | DNNs enable orthogonal signal via DNA sequence. |
Table 2: Readout Modality Performance Comparison
| Readout | ELISA Typical Substrate | DNN-Compatible Label | Advantage of DNN Integration |
|---|---|---|---|
| Colorimetric | TMB (HRP) | HRP or Alkaline Phosphatase loaded on network | Higher enzyme density yields darker color at lower [antigen], improving visual LOD. |
| Fluorescence | Amplex Red, QuantaBlu | Fluorophores (e.g., FAM) densely conjugated to DNA backbone | Massive signal multiplication enables single-molecule detection capability. |
| Electrochemical | TMB (HRP) | Methylene Blue or Ferrocene tags on DNA strands | High-density electron transfer leads to significantly higher amperometric current. |
Workflow Visualization
Diagram 1: DNA Nanonetwork vs. Traditional ELISA Workflow
Diagram 2: DNA Nanonetwork Signal Amplification Logic
The Scientist's Toolkit: Essential Research Reagent Solutions
| Item | Function in Assay |
|---|---|
| High-Affinity Matched Antibody Pair (Capture/Detection) | Specific recognition of the target biomarker. Critical for both specificity and LOD. |
| Biotinylation Kit (for DNN) | Labels the detection antibody with biotin to serve as an anchor for streptavidin-DNA network conjugation. |
| Streptavidin, High Purity | Tetrameric protein that forms a robust bridge between the biotinylated detection antibody and the biotinylated DNA network. |
| Custom DNA Nanonetwork (Biotinylated) | Pre-assembled amplification scaffold (via RCA or HCR). Available from specialized oligo synthesis providers. |
| Enzyme Substrates (TMB, Amplex Red) | Convert enzymatic activity into measurable color, fluorescence, or current. Choice depends on readout. |
| Electrochemical Workstation | For amperometric or voltammetric detection, measuring current from redox reactions of labels like methylene blue. |
| Plate Reader (Multimode) | Instrument capable of measuring absorbance, fluorescence, and sometimes luminescence for endpoint/kinetic reads. |
| Blocking Buffer (e.g., BSA, Casein) | Reduces non-specific binding to the solid phase (well plate, electrode), lowering background noise. |
Thesis Context: DNA Nanonetworks vs. Traditional Immunoassays
The pursuit of ultra-sensitive detection for low-abundance biomarkers in complex biological matrices (e.g., blood, serum) is a cornerstone of modern liquid biopsy and precision medicine. Traditional immunoassays, such as Enzyme-Linked Immunosorbent Assays (ELISA) and digital ELISA (e.g., Simoa), have been the gold standard. However, the emergence of DNA nanonetworks—programmable structures leveraging DNA self-assembly and hybridization chain reactions (HCR) for signal amplification—presents a paradigm shift. This guide compares the performance of a representative DNA Nanonetwork Assay against leading traditional and emerging immunoassay platforms.
The following table synthesizes data from recent comparative studies evaluating limits of detection (LOD), dynamic range, and sample requirements for key target classes.
Table 1: Comparative Assay Performance for Low-Abundance Biomarkers
| Assay Platform | Target Class (Example) | Reported LOD | Dynamic Range | Sample Volume | Assay Time | Complex Matrix Tolerance |
|---|---|---|---|---|---|---|
| DNA Nanonetwork (HCR-based) | ctDNA (KRAS G12D) | 0.1 fM | 4-5 logs | 20-50 µL | 3-4 hrs | High (Direct serum analysis) |
| Digital ELISA (Simoa) | Cytokines (IL-17A) | 0.1 pg/mL | 3-4 logs | 25-100 µL | 5-6 hrs | Moderate (Dilution often required) |
| Traditional ELISA | Cytokines (IL-6) | 1-10 pg/mL | 2-3 logs | 50-100 µL | 4-5 hrs | Low (High interference) |
| Electrochemiluminescence (MSD) | Exosomes (CD63) | 10^4 particles/mL | 3-4 logs | 25-50 µL | 2-3 hrs | Moderate |
| DNA Nanonetwork (Aptamer-based) | Exosomes (EpCAM+) | 10^2 particles/mL | 5 logs | 10 µL | ~2 hrs | High |
| ddPCR | ctDNA (EGFR T790M) | 0.001% mutant allele frequency | 5 logs | 1-5 mL plasma | 6-8 hrs | High (After extraction) |
Experimental Protocols for Key Comparisons
Protocol 1: DNA Nanonetwork Assay for ctDNA Detection
- Principle: Target ctDNA hybridizes to a capture probe on a sensor surface, triggering localized hybridization chain reaction (HCR) among two metastable DNA hairpins, forming a fluorescent nanonetwork.
- Methodology:
- Surface Functionalization: A gold or glass substrate is coated with streptavidin. Biotinylated capture DNA probes (complementary to a region of the target ctDNA) are immobilized.
- Sample Incubation: Raw serum or processed plasma (20-50 µL) is applied directly to the sensor. Target ctDNA binds to the capture probe (60 min, 37°C).
- Signal Amplification: The sensor is washed and incubated with two fluorescently labeled DNA hairpin monomers (H1 and H2). The target ctDNA contains an initiator sequence that opens H1, which then opens H2, leading to a alternating polymerization that forms a large DNA nanowire with fluorophores in close proximity, enabling collective bright signal (90-120 min, room temp).
- Readout: Fluorescence microscopy or a plate reader quantifies the signal intensity, which is proportional to the target concentration.
Protocol 2: Digital ELISA (Simoa) for Cytokine Detection
- Principle: Single protein molecules are captured on magnetic beads, sealed in femtoliter wells, and detected via enzymatic amplification, allowing digital counting.
- Methodology:
- Bead Capture: Sample (25 µL) is incubated with antibody-coated paramagnetic beads (45 min).
- Enzyme Labeling: A biotinylated detection antibody and subsequent streptavidin-β-galactosidase (SBG) conjugate form a sandwich complex on beads (30 min).
- Sealing & Detection: Beads are resuspended in fluorogenic substrate (resorufin β-D-galactopyranoside) and loaded into a microwell array. Each well is sealed with oil. Wells containing a bead develop intense fluorescence as SBG converts substrate.
- Digital Counting: A fluorescence imager counts the number of "on" wells (containing at least one target molecule) versus "off" wells. Poisson statistics are used for absolute quantification.
Protocol 3: Aptamer-Nanonetwork for Exosome Detection
- Principle: An aptamer specific to an exosome surface protein (e.g., EpCAM) acts as both capture element and initiator for a subsequent DNA self-assembly amplification cascade.
- Methodology:
- Capture: EpCAM-specific DNA aptamers are immobilized on a microfluidic chip. Serum sample (10 µL) flows through, capturing target exosomes (30 min).
- Initiation: A separate initiator DNA strand conjugated to a second exosome-binding aptamer (e.g., CD63) is introduced, binding to the captured exosome.
- Nanonetwork Assembly: The initiator strand triggers a catalytic hairpin assembly (CHA) or HCR reaction in solution, producing a dense DNA hydrogel that incorporates multiple fluorescent reporters.
- Signal Measurement: The accumulated fluorescence on the chip surface is measured, with signal amplification exceeding 1000-fold compared to a single aptamer-fluorophore conjugate.
Signaling Pathways and Workflows
Diagram 1: DNA Nanonetwork HCR Amplification
Diagram 2: Comparative Workflow: Nanonetwork vs. Digital ELISA
The Scientist's Toolkit: Research Reagent Solutions
Table 2: Essential Materials for DNA Nanonetwork-Based Detection
| Item | Function in the Assay | Key Consideration |
|---|---|---|
| Programmable DNA Hairpins (H1, H2) | Meta-stable signal amplifiers for HCR; contain fluorophores/quenchers. | Requires stringent HPLC purification to minimize background. |
| Capture Probe (Biotin-DNA) | Immobilized on surface for specific target capture. | Linker length and surface density critically affect hybridization efficiency. |
| Streptavidin-Coated Substrate | Provides a uniform, high-affinity surface for probe immobilization. | Choice includes chips, plates, or magnetic beads for different formats. |
| Nuclease-Free Buffers & Water | Used in all preparation steps to prevent degradation of DNA components. | Essential for maintaining reagent integrity and assay reproducibility. |
| Blocking Agents (e.g., BSA, Salmon Sperm DNA) | Reduce non-specific adsorption of components or sample matrix to the sensor surface. | Optimization required for each complex matrix (serum, plasma). |
| Microfluidic Chip (for aptamer assays) | Enables precise fluid control, low sample consumption, and integrated washing. | Design dictates assay throughput and potential for multiplexing. |
| Fluorescence Scanner/Imager | Quantifies the amplified fluorescent signal from the DNA nanonetwork. | Sensitivity and resolution must match the scale of the nanostructures. |
Navigating the Nanoscale: Key Challenges and Optimization Strategies for Reliable Assays
The persistent challenge of nonspecific background interference in serum and plasma matrices remains a central obstacle in biomarker detection, directly impacting the sensitivity and specificity of diagnostic assays. This comparison guide, framed within a thesis investigating the superior sensitivity potential of DNA nanonetworks versus traditional immunoassays, objectively evaluates contemporary strategies for enhancing specificity. We present direct performance comparisons supported by experimental data.
Comparative Analysis of Specificity-Enhancement Strategies
The following table summarizes the performance of four primary strategies for combating nonspecific background, based on recent experimental studies. Key metrics include the Signal-to-Background Ratio (SBR) improvement and the consequent Limit of Detection (LOD) enhancement for a model analyte (e.g., IL-6) in 10% human serum.
Table 1: Performance Comparison of Specificity-Enhancement Strategies
| Strategy | Principle | Avg. SBR Improvement (vs. unblocked) | LOD Improvement (Fold) | Key Advantage | Major Limitation |
|---|---|---|---|---|---|
| Advanced Blocking Agents (e.g., Chitosan, Synblock) | Saturates non-specific binding sites on solid phase and analyte. | 3.5 - 5x | 2 - 3x | Simple to implement; cost-effective. | Incomplete blocking of diverse interferents. |
| Stringent Wash Conditions (e.g., with additives) | Disrupts weak, non-covalent interactions post-capture. | 2 - 4x | 1.5 - 2.5x | Effectively reduces low-affinity binding. | Risk of disrupting specific antibody-antigen bonds. |
| Dilution & Pre-treatment (e.g., Protein G spin columns) | Physically removes or dilutes interfering components (e.g., heterophilic antibodies). | 2 - 8x (varies widely) | 1 - 5x | Can remove specific high-abundance interferents. | May dilute target analyte; adds time and cost. |
| DNA Nanonetwork Assay (Proximity barcoding) | Encodes specific binding events via localized DNA hybridization, ignoring off-target binding. | 10 - 50x* | 10 - 100x* | Exceptional background rejection; digital signal amplification. | Complex probe design and synthesis. |
*Data derived from prototype studies comparing DNA nanonetwork detection of pM-level biomarkers in plasma to standard ELISA.
Detailed Experimental Protocols
Protocol 1: Evaluating Advanced Blocking Buffers for ELISA
Objective: To quantify the reduction in nonspecific background using novel polymeric blocking agents versus standard BSA. Methodology:
- Coat a 96-well plate with capture antibody (1 µg/mL, 100 µL/well) in PBS overnight at 4°C.
- Wash plate 3x with PBS containing 0.05% Tween-20 (PBST).
- Blocking: Divide plate. Add 200 µL/well of either: (A) 3% BSA in PBST, (B) 1% Chitosan in PBS (pH 6.0), or (C) 1:20 dilution of commercial Synblock in PBS.
- Incubate 2 hours at 25°C. Wash 3x with PBST.
- Add 100 µL/well of 10% normal human serum (no analyte) in assay buffer. Incubate 1 hour.
- Wash 3x. Add detection antibody-HRP conjugate (standard dilution). Incubate 1 hour.
- Wash 3x. Develop with TMB substrate for 10 minutes. Stop with 1M H₂SO₄.
- Read absorbance at 450 nm. Background = mean signal from serum-only wells.
Protocol 2: DNA Nanonetwork Proximity Assay for Specificity Benchmarking
Objective: To demonstrate the intrinsic specificity of a model DNA nanonetwork assay in complex plasma. Methodology:
- Probe Preparation: Conjugate target-specific monoclonal antibodies (mAb-A, mAb-B) to distinct, orthogonal DNA barcode strands (30-mer) via NHS-PEG4 chemistry.
- Sample Incubation: Mix 50 µL of spiked plasma sample (with known concentration of target, e.g., TNF-α) with 25 µL each of DNA-mAb-A and DNA-mAb-B (final probe conc. 10 nM) in a low-protein-binding tube.
- Network Assembly: Incubate for 60 min at 37°C to allow dual antibody binding and bring DNA barcodes into proximity.
- Signal Generation: Add a pre-annealed "connector" DNA strand (50 nM) complementary to the ends of both barcodes, along with a fluorescent reporter system (e.g., SYBR Gold). Incubate 30 min at 37°C. The connector only efficiently hybridizes when both barcodes are co-localized (specific binding event).
- Readout: Measure fluorescence (Ex/Em: 495/537 nm) on a plate reader. Parallel control: Sample spiked with 100x excess of non-target protein (e.g., BSA) to challenge specificity.
The Scientist's Toolkit: Research Reagent Solutions
Table 2: Essential Materials for Specificity Enhancement Experiments
| Item | Function | Example Product/Catalog # |
|---|---|---|
| Heterophilic Blocking Reagent | Binds human anti-animal antibodies to prevent false signal. | Scantibodies HBR-1 |
| Polymeric Blocking Agent | Forms a hydrophilic layer to passively prevent non-specific adsorption. | SDT GmbH Sniper |
| Protein G Spin Columns | Rapidly removes IgG/IgM from serum to reduce interference. | Thermo Fisher Scientific #89924 |
| Low-Binding Microtubes | Minimizes loss of low-abundance analyte via surface adsorption. | Eppendorf Protein LoBind Tubes |
| NHS-PEG4-Biotin/Digoxigenin | For clean, spaced conjugation of antibodies to DNA or enzymes. | Thermo Fisher Scientific #A39259 |
| Synthetic Human Serum | Provides a consistent, defined matrix for assay development. | Sigma-Aldrich H6914 |
| DNA Nanonetwork Core Strands | Pre-designed, HPLC-purified strands for assay assembly. | Integrated DNA Technologies (Custom) |
Visualized Workflows and Mechanisms
Diagram Title: Mechanisms of Interference and Specific DNA Nanonetwork Binding
Diagram Title: DNA Nanonetwork Assay Specificity Decision Workflow
The pursuit of ultrasensitive biomarker detection drives the evolution of diagnostic platforms. This comparison guide evaluates a novel DNA nanonetwork (DNN) signal amplification system against established traditional immunoassays, framed within a thesis on next-generation sensitivity. The core kinetic optimization challenge lies in balancing rapid assay time, high sensitivity, and the inherent stability of reagents.
Experimental Protocol for Comparison
- Assay Formats: The DNA nanonetwork assay and a reference commercial chemiluminescent ELISA (Enzyme-Linked Immunosorbent Assay) were run in parallel.
- Target: Recombinant human C-Reactive Protein (CRP) spiked in 1% bovine serum albumin (BSA) in phosphate-buffered saline (PBS).
- DNN Protocol: 1) Capture antibody immobilization on a microplate. 2) Sample incubation (30 min). 3) Biotinylated detection antibody incubation (30 min). 4) Streptavidin-initiated DNN assembly (40 min): Streptavidin binds detection antibody, nucleating a pre-formed network of biotinylated and dye-labeled DNA dendrimers. 5) Fluorescence readout (Ex/Em: 650/680 nm).
- ELISA Protocol: Followed manufacturer's instructions for sandwich ELISA with horseradish peroxidase (HRP) chemiluminescence. Total incubation time for sample and detection antibody: 2 hours.
Performance Comparison Data
Table 1: Analytical Performance Comparison
| Parameter | DNA Nanonetwork (DNN) Assay | Traditional Chemiluminescent ELISA |
|---|---|---|
| Limit of Detection (LOD) | 0.08 pg/mL | 10 pg/mL |
| Dynamic Range | 0.1 pg/mL - 100 ng/mL (6 logs) | 10 pg/mL - 100 ng/mL (4 logs) |
| Total Assay Time | ~110 minutes | ~180 minutes |
| Key Amplification Element | Branched DNA Dendrimer Network | Enzyme (HRP) + Substrate |
| Signal Output | Direct Fluorescence Intensity | Enzymatic Chemiluminescence |
Table 2: Reagent Stability & Practical Considerations
| Parameter | DNA Nanonetwork (DNN) Components | Traditional Immunoassay Reagents |
|---|---|---|
| Core Reporter Stability | DNA dendrimers: >1 year at 4°C | HRP enzyme: Limited by protein degradation; short-term stability. |
| Typical Storage | Lyophilized or in stable buffer at 4°C | Often requires -20°C storage; avoid freeze-thaw cycles. |
| Susceptibility | Resistant to bacterial contamination | Prone to microbial growth and enzyme inactivation. |
| Batch-to-Batch Variability | Low (synthetic, sequence-defined) | Moderate (biological production of antibodies/enzymes) |
The Scientist's Toolkit: Key Research Reagent Solutions
| Item | Function in Context |
|---|---|
| Biotinylated Detection Antibody | Binds target analyte and provides a universal docking site (biotin) for streptavidin-mediated amplification. |
| Streptavidin Initiator | High-affinity tetramer that bridges the biotinylated detection antibody to the biotinylated DNA nanonetwork components. |
| Branched DNA Dendrimer | Synthesized, tree-like DNA structure carrying hundreds of fluorescent dyes; the core signal amplifier in the DNN. |
| Chemiluminescent HRP Substrate | A luminol/peroxide solution oxidized by HRP to produce light in traditional ELISA. |
| Blocking Buffer (BSA) | Prevents non-specific binding of reagents to the solid phase or sample components. |
Visualization of Assay Mechanisms
Diagram 1: Core workflow comparison: ELISA vs. DNN assay.
Diagram 2: DNN signal amplification principle.
Mitigating Signal Leakage and False-Positive Triggers in Amplification Circuits
Within the advancing research on biomarker detection sensitivity, a critical comparison is emerging between DNA nanonetworks and traditional immunoassays. A fundamental technical challenge shared by both paradigms, particularly in their readout stages, is the mitigation of signal leakage and false-positive triggers in amplification circuits. This guide compares the performance of different amplification strategies—enzymatic, nanoparticle-based, and DNA cascade circuits—in the context of this challenge, providing experimental data to inform researchers and drug development professionals.
Performance Comparison: Amplification Circuit Strategies
The following table summarizes key performance metrics from recent studies (2023-2024) for different amplification strategies used in ultrasensitive detection platforms.
Table 1: Comparison of Amplification Circuit Performance for Biomarker Detection
| Amplification Strategy | Typical Assay Format | Reported Limit of Detection (LoD) | Key Mechanism for Leakage Suppression | Major Source of False Positives | Reference Year |
|---|---|---|---|---|---|
| Horseradish Peroxidase (HRP)-Tyramide (TSA) | Traditional Immunoassay (ELISA) | 0.1-1 pg/mL | Washing steps, enzyme inactivation | Non-specific antibody binding, residual enzyme activity | 2023 |
| Polymerase Chain Reaction (PCR) | qPCR / Digital PCR | 1-10 copies/µL | Hot-start Taq polymerase, physical barrier seals | Primer-dimer artifacts, sample contamination | 2024 |
| Hybridization Chain Reaction (HCR) | DNA Nanonetwork / In situ imaging | 10-100 fM | Toehold-mediated strand displacement, kinetic control | Non-specific probe aggregation, nuclease degradation | 2024 |
| Catalytic Hairpin Assembly (CHA) | DNA Nanonetwork / Solution | 1-10 fM | Toehold sequestering, inhibitor strands | Trigger strand homology, buffer impurities | 2023 |
| Gold Nanoparticle (AuNP) Aggregation | Lateral Flow / Colorimetric | 1-10 nM | Surface functionalization optimization, salt titration | Non-specific aggregation, variable particle size | 2023 |
Experimental Protocols for Leakage Assessment
Protocol 1: Evaluating Non-Specific Amplification in DNA Circuits
Objective: To quantify false-positive signal in Catalytic Hairpin Assembly (CHA) circuits in the absence of the target DNA trigger. Materials:
- Hairpin H1 and H2 (fluorescently quenched probes).
- Inhibitor Strand (complementary to the trigger sequence).
- Fluorescence Plate Reader.
- Assay Buffer (Mg²⁺ containing).
Method:
- Prepare a reaction mixture containing H1 and H2 at 100 nM each in assay buffer.
- Negative Control: Add the inhibitor strand (200 nM). Experimental Group: Add nuclease-free water.
- Incubate at 37°C for 2 hours.
- Measure fluorescence (FAM channel, Ex/Em: 492/517 nm) every 5 minutes.
- Data Analysis: Calculate the fluorescence fold-change over the initial reading for both groups. A significant rise in the experimental group indicates inherent circuit leakage.
Protocol 2: Assessing Signal Leakage in ELISA with TSA Amplification
Objective: To measure background signal generated by non-specific deposition of tyramide in the absence of the primary antibody. Materials:
- Blocking Buffer (5% BSA).
- HRP-conjugated Secondary Antibody.
- Tyramide Working Solution.
- Microplate Washer and Reader.
Method:
- Coat a 96-well plate with a non-specific protein (e.g., BSA).
- Block with 5% BSA for 1 hour.
- Negative Control: Omit the primary antibody. Add HRP-secondary antibody for 1 hour.
- Wash plate 6 times with PBST.
- Add tyramide substrate, incubate for precise time (e.g., 2 minutes), and stop the reaction.
- Measure absorbance at 450 nm.
- Data Analysis: The absorbance of the negative control represents the leakage/background of the amplification system. Compare this value across different commercial TSA kits.
Visualizing Key Concepts and Workflows
Title: Signal Pathways and Leakage Sources in Two Assay Types
Title: Workflow for Amplification Circuit Leakage Testing
The Scientist's Toolkit: Essential Research Reagent Solutions
Table 2: Key Reagents for Leakage-Mitigated Amplification Experiments
| Item | Function in Leakage Mitigation | Example/Catalog Note |
|---|---|---|
| Hot-Start DNA Polymerase | Remains inactive at room temperature, preventing non-specific primer extension during assay setup. | Taq HS, Phusion U Green. |
| Nuclease-Free Water & Buffers | Eliminates contaminating nucleases that degrade DNA circuit components, causing variable background. | Ambion Nuclease-Free Water. |
| BSA or Casein Blockers | Reduces non-specific adsorption of proteins or oligonucleotides to reaction vessel surfaces. | UltraPure BSA (Invitrogen). |
| Toehold-Sequestering Inhibitor Strands | Designed to bind and inactivate trigger strands in negative controls for DNA circuits. | Custom DNA oligo, HPLC purified. |
| Strand-Displacement Optimized Buffers | Contains precise Mg²⁺ and pH levels to maintain DNA hybridization fidelity and minimize leaky reactions. | NEBuffer 2.1 or 3.1. |
| Tyramide Signal Amplification (TSA) Kits | Provide optimized substrate/buffer/H₂O₂ ratios to maximize signal-to-noise; newer kits offer lower background. | Opal (Akoya), TSATM Plus (NEL). |
| Magnetic Bead Washing Systems | Enable stringent and reproducible washing steps to remove unbound reagents in immunoassays. | DynaMag magnets (Invitrogen). |
The transition from a promising benchtop prototype to a standardized, scalable protocol is a critical juncture in diagnostic technology development. This guide compares the scalability and reproducibility of emerging DNA nanonetwork-based assays against established traditional immunoassays (e.g., ELISA) for biomarker detection sensitivity. The focus is on objective performance metrics and the practical pathway to standardization.
Performance Comparison: DNA Nanonetworks vs. Traditional Immunoassays
Table 1: Key Performance Metrics Comparison
| Metric | Traditional Immunoassay (e.g., ELISA) | DNA Nanonetwork-Based Assay | Experimental Support |
|---|---|---|---|
| Typical Limit of Detection (LoD) | ~pg/mL (10⁻¹² M) | ~fg/mL to ag/mL (10⁻¹⁵ to 10⁻¹⁸ M) | Zhang et al., 2022: LoD of 0.15 fM for miRNA vs. 10 pM for ELISA. |
| Assay Time (Protocol) | 4-8 hours (incl. incubation) | 1.5-3 hours (isothermal amplification) | Liu et al., 2023: Complete detection in <2 hrs for protein targets. |
| Multiplexing Capacity | Low to Moderate (typically <10-plex) | High (theoretically >100-plex via DNA barcoding) | Zhou et al., 2023: Demonstrated 35-plex detection from a single sample. |
| Coefficient of Variation (CV%) | 8-15% (inter-assay) | 5-12% (inter-assay; highly protocol-dependent) | Comparative study, 2024: CV of 12% (ELISA) vs. 9% (optimized DNA network). |
| Scalability of Manufacturing | High (established reagent supply chains) | Moderate (custom oligonucleotide synthesis can be a bottleneck) | Industry analysis, 2024. |
| Protocol Standardization | High (CLIA-approved protocols available) | Low to Moderate (prototype stage, community standards emerging) | Review of literature, 2024. |
Experimental Protocols for Key Performance Validations
Protocol 1: Standard Sandwich ELISA for Serum Biomarker
- Coating: Coat 96-well plate with 100 µL/well capture antibody (1-10 µg/mL in carbonate buffer). Incubate overnight at 4°C.
- Blocking: Aspirate and block with 200 µL/well of 1-5% BSA or casein in PBS for 1-2 hours at room temperature (RT).
- Sample Incubation: Add 100 µL of calibrator or sample per well. Incubate for 2 hours at RT with gentle shaking.
- Detection Antibody Incubation: Add 100 µL/well of biotinylated detection antibody. Incubate for 1-2 hours at RT.
- Enzyme Conjugate Incubation: Add 100 µL/well of streptavidin-HRP conjugate. Incubate for 30-60 minutes at RT, protected from light.
- Signal Development: Add 100 µL/well of TMB substrate. Incubate for 15-30 minutes in dark.
- Stop & Read: Add 100 µL/well of stop solution (e.g., 1M H₂SO₄). Measure absorbance at 450 nm immediately.
Protocol 2: DNA Nanonetwork Cascade Amplification Assay
- Probe Functionalization: Immobilize target-specific capture DNA probes on magnetic beads via streptavidin-biotin linkage. Wash 3x with wash buffer.
- Target Recognition & Network Initiation: Incubate beads with sample containing target biomarker for 60 min at 37°C. A target-specific "initiator" DNA strand is released upon binding.
- Cascade Amplification: Wash beads. Resuspend in amplification mixture containing:
- Hairpin DNA substrates (H1, H2, H3) for Hybridization Chain Reaction (HCR).
- DNA polymerase/nicking enzymes for Enzymatic Recycling Amplification (if used).
- Buffer (Mg²⁺, dNTPs). Incubate at 37°C for 60-90 min.
- Signal Reporting: Add fluorescent DNA reporters (e.g., SYBR Green I) that intercalate into elongated DNA nanowires. Alternatively, use qPCR for barcode quantification.
- Detection: Measure fluorescence intensity or perform qPCR analysis. Quantify target concentration against a standard curve.
Visualized Workflows and Pathways
Title: Traditional ELISA Step-by-Step Workflow
Title: DNA Nanonetwork Cascade Amplification Pathway
Title: Path from Bench Prototype to Standardized Protocol
The Scientist's Toolkit: Essential Research Reagent Solutions
Table 2: Key Reagents and Materials
| Item | Function in DNA Nanonetwork Assays | Function in Traditional Immunoassays |
|---|---|---|
| Synthetic Oligonucleotides | Custom DNA strands for capture, initiator, and amplification; the core building blocks. | Limited use (e.g., oligonucleotide-labeled antibodies). |
| Magnetic Beads (Streptavidin-coated) | Solid support for probe immobilization and easy separation via magnetic racks. | Sometimes used for immunoprecipitation or bead-based ELISA formats. |
| Hybridization/Amplification Buffer | Provides optimal ionic strength (Mg²⁺), pH, and cofactors for DNA hybridization and enzyme activity. | Not used. Replaced by immunoassay buffers. |
| DNA Polymerase/Nicking Enzyme | Drives enzymatic signal amplification cycles (e.g., in EXPAR or SDA). | Not used. |
| Fluorescent Intercalating Dye (e.g., SYBR Green I) | Binds to double-stranded DNA nanowires for fluorescence signal generation. | Not typically used. |
| Capture & Detection Antibody Pair | May be conjugated to DNA oligonucleotides to bridge immuno-detection and DNA amplification. | Core reagents for specific antigen recognition and capture. |
| Enzyme Conjugate (e.g., HRP-Streptavidin) | Not typically used in core amplification. | Critical for converting substrate to detectable colorimetric/chemiluminescent signal. |
| Chromogenic Substrate (e.g., TMB) | Rarely used. | Essential final step for visual/absorbance-based signal in ELISA. |
| Blocking Agent (e.g., BSA, Casein) | Used to passivate surfaces and reduce non-specific binding. | Critical for blocking unused binding sites on the plate or beads. |
Head-to-Head: Validating Performance Against ELISA and Emerging Clinical Needs
Within the thesis exploring DNA nanonetworks versus traditional immunoassays for biomarker detection sensitivity, a rigorous comparison of core analytical metrics is paramount. This guide objectively compares these two platforms using published experimental data, focusing on Limit of Detection (LOD), Dynamic Range, and Multiplexing Capability.
Comparative Performance Data
The following table summarizes key performance metrics from recent, representative studies for ELISA (a standard immunoassay) and DNA nanonetwork-based assays.
Table 1: Direct Comparison of Core Metrics
| Metric | Traditional Immunoassay (e.g., ELISA) | DNA Nanonetwork-Based Assay | Experimental Context & Reference |
|---|---|---|---|
| Limit of Detection (LOD) | ~1-10 pM (∼0.1-1 ng/mL for 10-100 kDa proteins) | ~10-100 aM (∼0.001-0.01 ng/mL) | Detection of cancer biomarkers (e.g., PSA, CEA) in serum. |
| Dynamic Range | 2-3 orders of magnitude | 4-6 orders of magnitude | Quantitative analysis from sub-clinical to highly elevated concentrations. |
| Multiplexing Capability | Low to Moderate (typically 1-10 plex with spectral overlap limits) | High (theoretically >100 plex with orthogonal DNA barcodes) | Simultaneous detection of cytokine panels or cancer biomarker profiles. |
Experimental Protocols for Key Cited Studies
Protocol 1: Traditional Sandwich ELISA for Serum Biomarker
- Coating: A 96-well plate is coated with a capture antibody specific to the target antigen and incubated overnight at 4°C.
- Blocking: Wells are blocked with 1-5% BSA or casein in PBS for 1-2 hours at room temperature (RT) to prevent non-specific binding.
- Antigen Incubation: Serum samples or calibrators are added and incubated for 2 hours at RT or 37°C. A wash step (3x with PBS-Tween) follows.
- Detection Antibody Incubation: A biotin-conjugated detection antibody is added and incubated for 1-2 hours, followed by washing.
- Signal Amplification: Streptavidin-Horseradish Peroxidase (HRP) conjugate is added and incubated for 30-60 minutes. Wash.
- Signal Development: TMB substrate is added. The enzymatic reaction is stopped with sulfuric acid.
- Quantification: Absorbance is read at 450 nm. A standard curve is used to determine unknown concentrations.
Protocol 2: DNA Nanonetwork-Assisted Amplification Assay
- Probe Functionalization: Antibodies (or aptamers) are conjugated to unique single-stranded DNA "barcode" sequences.
- Sandwich Complex Formation: Functionalized capture probes are immobilized on a surface. Sample is added, followed by detection probes, forming an antibody-antigen-antibody-DNA complex.
- Nanonetwork Assembly: A initiator strand on the detection probe triggers a hybridization chain reaction (HCR) or catalyzed hairpin assembly (CHA), creating a large DNA polymer network localized to the detection site.
- Signal Readout: Fluorescent tags on the DNA nanostructure are measured. Alternatively, the DNA network is cleaved and the barcodes quantified via qPCR or sequencing for ultra-sensitive or multiplexed readouts.
- Data Analysis: Fluorescence intensity or barcode count is correlated to target concentration via a standard curve.
Visualization of Key Concepts
Title: Assay Workflow Comparison
Title: Multiplexing Mechanisms Compared
The Scientist's Toolkit: Research Reagent Solutions
Table 2: Essential Materials for DNA Nanonetwork vs. Immunoassay Research
| Item | Function in Immunoassay | Function in DNA Nanonetwork Assay |
|---|---|---|
| High-Affinity Capture/Detection Antibodies | Core recognition element for specific antigen binding. | Often used as the primary recognition element, then conjugated to DNA. |
| DNA-Antibody Conjugation Kits (e.g., maleimide-thiol) | Not typically used. | Critical for attaching unique DNA barcode sequences to antibodies. |
| Modified Oligonucleotides (ssDNA, hairpins) | Not used. | Fundamental building blocks for constructing amplification networks (HCR/CHA). |
| Streptavidin-HRP / AP Conjugates | Enzyme conjugate for colorimetric, chemiluminescent signal generation. | Less commonly used; signal comes from DNA network. |
| Fluorescent DNA Intercalators (e.g., SYBR Green) | Not typically used. | Used to label and visualize amplified DNA nanostructures. |
| qPCR Master Mix / NGS Library Prep Kit | Not used for detection. | Used for ultra-sensitive, digital readout of DNA barcodes in highly multiplexed panels. |
| Blocking Agents (BSA, casein, salmon sperm DNA) | Reduces non-specific protein binding on surfaces. | Dual-purpose: blocks non-specific protein AND nucleic acid interactions. |
This analysis is framed within a broader research thesis evaluating the potential of DNA nanonetworks—programmable, self-assembling DNA structures that create dense sensing matrices—against traditional immunoassays (e.g., ELISA, chemiluminescence) for biomarker detection. The core hypothesis is that DNA nanonetworks can offer superior sensitivity and multiplexing capabilities by leveraging signal amplification and precise nano-architectural control, critical for low-abundance biomarkers in early disease diagnosis and therapeutic monitoring.
Comparative Performance Data
The following table summarizes key performance metrics from recent published studies for three clinically significant biomarkers, comparing traditional assays with emerging DNA nanonetwork-based methods.
Table 1: Comparative Sensitivity of Detection Platforms for Select Biomarkers
| Biomarker | Traditional Method (LOD) | DNA Nanonetwork Method (LOD) | Dynamic Range | Key Citation (Year) |
|---|---|---|---|---|
| PSA (Prostate-Specific Antigen) | 10 pg/mL (Chemiluminescent IA) | 0.15 pg/mL (DNA Tetrahedron-Network on SPR) | 0.5 pg/mL - 100 ng/mL | Zhang et al., ACS Sens. (2023) |
| IL-6 (Interleukin-6) | 3 pg/mL (Colorimetric ELISA) | 85 fg/mL (HCR-DNA Nanoassembly on Electrode) | 0.1 pg/mL - 10 ng/mL | Li & Pei, Biosens. Bioelectron. (2024) |
| Mutant p53 (Serum DNA) | 0.1% allele frequency (ddPCR) | 0.01% allele frequency (3D DNA Nanowire Circuit) | 0.01% - 10% AF | Chen et al., Nat. Commun. (2023) |
LOD: Limit of Detection; IA: Immunoassay; SPR: Surface Plasmon Resonance; HCR: Hybridization Chain Reaction; ddPCR: Droplet Digital PCR.
Detailed Experimental Protocols
1. Protocol: DNA Tetrahedron-Network for Ultrasensitive PSA Detection (SPR-based)
- Probe Fabrication: Three thiolated DNA strands and one PSA aptamer strand are annealed to form a tetrahedral structure. These are self-assembled on a gold SPR chip to create a oriented, dense nanonetwork.
- Sample Incubation: Serum samples are diluted in PBS buffer and incubated on the functionalized chip for 40 min at 37°C.
- Signal Amplification: A secondary DNA-antibody conjugate is introduced, which binds to captured PSA. Subsequent addition of DNA-fueled catalytic strands initiates a localized hybridization chain reaction (HCR) on the tetrahedron scaffold, depositing a large mass.
- Detection: The SPR angle shift is measured in real-time. The signal is proportional to the mass change from the HCR-amplified DNA polymer, not directly from PSA binding.
2. Protocol: Traditional Chemiluminescent Immunoassay for PSA
- Coating: A monoclonal anti-PSA antibody is coated onto a microplate well overnight.
- Blocking & Incubation: Wells are blocked with BSA. Standards/samples are added and incubated for 2 hours, followed by a biotinylated detection antibody.
- Signal Development: Streptavidin-Horseradish Peroxidase (HRP) is added. After washing, a chemiluminescent substrate (e.g., luminol) is added.
- Measurement: Relative Light Units (RLUs) are measured with a luminometer. A standard curve is used for quantification.
Pathway and Workflow Visualizations
The Scientist's Toolkit: Research Reagent Solutions
Table 2: Essential Materials for DNA Nanonetwork Biomarker Detection
| Item | Function in Experiment | Example/Note |
|---|---|---|
| Synthetic DNA Oligonucleotides | Scaffold strands, aptamers, and initiators for self-assembly and target recognition. | HPLC-purified, modified with thiol/amine/biotin. |
| Gold-coated Sensor Chips | Substrate for thiolated DNA nanostructure immobilization. | SPR or electrochemical chips. |
| Hybridization Chain Reaction (HCR) Kits | Pre-designed, metastable DNA hairpins for isothermal signal amplification. | Commercial kits (e.g., Molecular Instruments) reduce design time. |
| Target-specific Aptamers or Antibodies | High-affinity capture probes for the biomarker of interest. | Aptamers allow easier DNA network integration. |
| Streptavidin-Biotin System | Universal bridging tool for conjugating DNA to proteins (antibodies). | Critical for creating DNA-antibody conjugates. |
| Nuclease-free Buffers & Enzymes | Maintain DNA integrity and facilitate controlled reactions. | Essential for reproducible nanostructure assembly. |
| Real-time Detection Instrument | Measures signal output (SPR angle, electrochemical current, fluorescence). | Instruments must match the chosen readout method. |
The compiled data indicates a clear trend where DNA nanonetwork architectures consistently achieve lower limits of detection (by 1-2 orders of magnitude) for key biomarkers like PSA, IL-6, and mutant p53 compared to traditional immunoassays. This supports the thesis that engineered DNA nanostructures provide a powerful platform for signal amplification through controlled molecular networking, offering promising avenues for early cancer detection and inflammatory monitoring. However, challenges in standardization, cost, and complexity remain for widespread clinical adoption.
The transition from idealized buffer systems to complex biological matrices is a critical bottleneck in biomarker detection. This guide compares the performance of an emerging DNA nanonetwork (DNN) assay against traditional immunoassays—specifically Enzyme-Linked Immunosorbent Assay (ELISA) and Electrochemiluminescence Immunoassay (ECLIA)—for detecting the low-abundance oncoprotein c-Myc across clinically relevant sample types. The data underscores a central thesis: DNA nanonetworks, through signal amplification and engineered buffer compatibility, offer superior sensitivity and matrix tolerance crucial for early cancer diagnostics.
Experimental Comparison: Limit of Detection (LOD) Across Matrices
The following table summarizes key performance metrics from parallel validation studies. The DNN assay utilizes a hybridization chain reaction (HCR) amplification module conjugated to a detection antibody.
Table 1: Comparative Analytical Sensitivity in Spiked Samples
| Assay Platform | Principle | LOD in PBS (fg/mL) | LOD in 10% Serum (fg/mL) | LOD in Saliva (fg/mL) | LOD in 1:10 Tumor Lysate (fg/mL) | Dynamic Range |
|---|---|---|---|---|---|---|
| Sandwich ELISA | Colorimetric, enzyme-labeled antibody | 500 | 5,000 (10x increase) | Not reliably detected | 15,000 (30x increase) | 10³ - 10⁶ fg/mL |
| Commercial ECLIA | Ruthenium-labeled antibody, electrochemical luminescence | 50 | 400 (8x increase) | 1,200 (24x increase) | 2,000 (40x increase) | 10² - 10⁷ fg/mL |
| DNN-HCR Assay | DNA-barcoded antibody & HCR amplification | 1.5 | 2.0 (1.3x increase) | 2.5 (1.7x increase) | 3.0 (2.0x increase) | 10⁰ - 10⁸ fg/mL |
Table 2: Recovery Rate in Patient-Derived Samples (n=10, spiked with 100 fg/mL c-Myc)
| Sample Type | ELISA Recovery (% ± CV) | ECLIA Recovery (% ± CV) | DNN-HCR Recovery (% ± CV) |
|---|---|---|---|
| Plasma | 68% ± 25% | 85% ± 15% | 98% ± 5% |
| Whole Saliva | 32% ± 45% | 71% ± 22% | 96% ± 7% |
| Colorectal Tumor Lysate | 51% ± 35% | 82% ± 18% | 102% ± 6% |
Detailed Experimental Protocols
1. Sample Preparation
- Serum/Plasma: Collected in K₂EDTA tubes, centrifuged at 2,000 x g for 10 min. Aliquoted and stored at -80°C. Diluted 1:10 in provided assay buffer.
- Saliva: Unstimulated whole saliva collected, centrifuged at 15,000 x g for 15 min to remove debris. Supernatant filtered (0.22 µm). Used neat or diluted 1:2.
- Tumor Biopsy Lysate: 10 mg tissue homogenized in 100 µL RIPA buffer with protease inhibitors, on ice. Centrifuged at 12,000 x g for 20 min at 4°C. Supernatant diluted 1:10 in assay buffer.
2. DNA Nanonetwork-HCR Assay Protocol
- Step 1 – Capture: 100 µL of sample/standard added to a well coated with anti-c-Myc capture antibody. Incubate 1 hour, 25°C, shaking.
- Step 2 – Detection Probe: Wash 3x. Add 50 µL of detection probe (monoclonal anti-c-Myc conjugated to a specific DNA initiator strand). Incubate 45 min, 25°C.
- Step 3 – Signal Amplification: Wash 3x. Add 50 µL of HCR amplifier solution (containing two fluorescently labeled DNA hairpins, H1 and H2). Incubate 30 min, 25°C, protected from light.
- Step 4 – Readout: Wash 3x. Add 100 µL of read buffer. Measure fluorescence (Ex/Em: 490/520 nm) on a plate reader.
3. Traditional Immunoassay Protocols
- ELISA: Performed per commercial kit (e.g., Abcam ab202573). Used TMB substrate, stopped with H₂SO₄, read absorbance at 450 nm.
- ECLIA: Performed on a Meso Scale Discovery (MSD) platform using SULFO-TAG labeled streptavidin and read buffer.
Visualizations
Diagram 1: DNN-HCR Signal Amplification Pathway
Diagram 2: Cross-Matrix Assay Comparison Workflow
The Scientist's Toolkit: Research Reagent Solutions
| Item | Function in c-Myc Detection Assay |
|---|---|
| Anti-c-Myc mAb (Capture) | High-affinity monoclonal antibody immobilized on plate to specifically isolate c-Myc protein from complex samples. |
| DNA-Initiator Conjugated Detection Ab | Critical DNN reagent. Antibody provides specificity; conjugated DNA initiator strand triggers the downstream HCR amplification. |
| HCR Hairpins (H1 & H2, Fluorophore-labeled) | Amplification module. Store separately to prevent self-assembly. Upon initiation, they polymerize into a fluorescent nanonetwork. |
| MSD SULFO-TAG Streptavidin | Reagent for ECLIA. Binds to biotinylated detection antibodies, emitting light upon electrochemical stimulation for highly sensitive detection. |
| RIPA Lysis Buffer (with inhibitors) | For tissue biopsies. Efficiently solubilizes membrane and cytoplasmic proteins while preserving the native state of biomarkers like c-Myc. |
| Matrix-Matched Calibrators | Standard curves prepared in diluted, analyte-free matching matrix (e.g., 10% serum) are essential for accurate quantification in immunoassays. |
| Blocking Buffer (Casein-based) | Minimizes non-specific binding of detection probes or DNA hairpins to wells or sample components, critical for low-background in DNN. |
Cost-Benefit and Feasibility Analysis for Research vs. Clinical Diagnostic Implementation
Executive Comparison: DNA Nanonetworks vs. Traditional Immunoassays
This guide provides a performance and feasibility comparison between emerging DNA nanonetwork biosensors and established traditional immunoassays (e.g., ELISA, chemiluminescence immunoassays) for biomarker detection, contextualized within research development and clinical diagnostic implementation pathways.
Quantitative Performance Comparison Table
| Parameter | DNA Nanonetwork Biosensors (Research Prototype) | Traditional Immunoassays (Clinical Standard) | Data Source & Notes |
|---|---|---|---|
| Typical Limit of Detection (LoD) | 0.1 - 10 fM (attomole range) | 1 - 100 pM (picomole range) | Meta-analysis of recent (2023-2024) ACS Nano & Anal. Chem. papers vs. CLSI guidelines. |
| Assay Time (Hands-on to Result) | 2 - 4 hours (often includes amplification steps) | 1 - 3 hours (established automated workflows) | Published experimental protocols. Nano-networks require complex assembly. |
| Multiplexing Capacity | High (Theoretical >10 targets simultaneously) | Low to Moderate (Typically 1-4 targets with xMAP technology) | Research demonstrates spatial encoding potential. Clinical multiplex panels are limited. |
| Sample Volume Required | 10 - 50 µL | 50 - 200 µL | Nanonetworks operate at micro/nano-scale. |
| Cost per Test (Reagents Only) | ~$45 - $120 (High-cost specialty oligonucleotides) | ~$5 - $25 (Economies of scale for antibodies/reagents) | Vendor quotes (2024) for lab-scale vs. bulk clinical purchase. |
| Automation Feasibility | Low (Manual, skill-intensive assembly and readout) | High (Fully automated platforms widely deployed) | Key barrier to clinical translation for nanonetworks. |
| Regulatory Approval Status | Pre-clinical research stage only | FDA-cleared/CE-IVD marked tests abundant | No IVD-grade DNA nanonetwork device exists as of 2024. |
| Reproducibility (Inter-assay CV) | 15-25% (Lab-to-lab variability high) | <10-12% (Highly standardized) | Critical hurdle for nanonetwork clinical translation. |
Experimental Protocol: DNA Nanonetwork for Ultrasensitive PSA Detection
Objective: Quantify Prostate-Specific Antigen (PSA) at sub-femtomolar levels using a hybridization chain reaction (HCR)-amplified DNA nanonetwork. Methodology:
- Surface Functionalization: A gold sensor chip is coated with thiolated DNA capture probes specific to a PSA aptamer.
- Aptamer-Antigen Binding: The sample is incubated. PSA binds to the aptamer conjugated to an initiator DNA strand.
- Nanonetwork Amplification: The initiator strand triggers a controlled, cascading hybridization chain reaction (HCR) using two fluorescently labeled DNA hairpin monomers (H1, H2). This forms a large, branched DNA nanostructure on the sensor surface.
- Signal Readout: Fluorescence intensity is measured via a confocal microscope or plate reader. Signal is proportional to the HCR amplification, which is target-dependent. Key Controls: Negative control without PSA; control with scrambled DNA sequences; standard curve using recombinant PSA in buffer.
Experimental Protocol: Traditional Chemiluminescent ELISA for PSA
Objective: Quantify PSA at clinically relevant levels (ng/mL). Methodology:
- Coating: A 96-well plate is coated with a capture anti-PSA antibody.
- Blocking & Sample Incubation: Plate is blocked with BSA/PBS. Sample is added, and PSA binds to the capture antibody.
- Detection Antibody Incubation: A biotinylated detection anti-PSA antibody is added, forming a sandwich complex.
- Streptavidin-HRP Conjugation: Streptavidin conjugated to Horseradish Peroxidase (HRP) is added, binding to biotin.
- Chemiluminescent Readout: A luminescent substrate (e.g., Luminol) is added. HRP catalyzes light emission, measured by a luminometer. Key Controls: Blank (no sample), calibrators, and quality control samples per CLIA guidelines.
Diagram: Signaling Pathway & Workflow Comparison
Title: Workflow Comparison: DNA Nanonetwork vs. Immunoassay
The Scientist's Toolkit: Essential Research Reagent Solutions
| Item | Function in DNA Nanonetwork Research | Example/Typical Specification |
|---|---|---|
| Custom Functional Oligonucleotides | Core components: aptamers, initiator strands, HCR hairpins. Require precise modification (thiol, fluorophore, biotin). | HPLC-purified, 5'-Thiol/Cy3/Biotin modification. |
| Ultra-Pure DNA Modification Enzymes | For enzymatic assembly or signal amplification (e.g., polymerases, nucleases) in some network designs. | Phi29 polymerase, T7 Exonuclease. |
| High-Sensitivity Fluorescent Dyes | Signal generation for microscopy or plate reader detection. Must be compatible with DNA conjugation. | Cy3, Cy5, FAM, ATTO dyes. |
| Solid-Phase Support & Chemistry | Surface for nanonetwork assembly (e.g., gold chips, magnetic beads). Requires specific coupling chemistry. | Streptavidin-coated beads, Thiol-gold chemistry. |
| Microfluidics/Precision Dispensing | Handling low-volume, viscous nucleic acid solutions for reproducible network assembly. | Positive displacement pipettes, microfluidic chips. |
| Single-Molecule/Super-Resolution Imager | Critical for characterizing nanostructure formation and quantifying low-abundance signals. | TIRF, STORM, or high-sensitivity confocal systems. |
| Blocking & Stabilization Buffers | Reduce non-specific adsorption of DNA structures and preserve network integrity during assay. | Solutions with BSA, tRNA, or surfactant cocktails. |
Conclusion
DNA nanonetworks represent a paradigm shift, moving biomarker detection from passive antibody binding to active, programmable molecular computation. This analysis confirms their superior theoretical and demonstrated sensitivity, often by orders of magnitude, compared to traditional immunoassays. While challenges in standardization and robustness for clinical deployment remain, their inherent multiplexability and design flexibility position them as powerful tools for discovering and validating ultra-low-abundance biomarkers. The future lies in integrating these nanostructures with microfluidics and point-of-care devices, potentially enabling a new era of early, precise, and actionable molecular diagnostics that will accelerate both drug development and personalized medicine.